Cooking
Menu
Here are my favorite recipes, click any to check it out!
A twist on the traditional grilled cheese and a secret how to ensure the cheese melts
Spanakopita (Greek spinach pie), Tiropita (Greek cheese pie), Meat Lovers Puff, Pork Pie, and Curry Puff
My comfort food and celebration food! Make at home with pantry staples and tips how to wrap your rolls
Or what I like to call it, "Tomato Yum Yum."
My favorite tomato soup, but updated! This is not just soup; it can be tomato sauce! ^^ This multipurpose tomato base is my favorite!
Two childhood ingredients I hated turned into a new adult favorite. I wish my childhood self would have tried this carrot soup! I would have been converted.
A controversial ingredient - liver. Even more controversial, its most famous appearance is as a paste or spread. But what if, it's steamed instead?
My dream pot roast that is inspired by Bob Evans with my taste! The BEST pot roast you could ever eat. No joke.
I have yet to know if this comforting dish is authentically Italian... but that doesn't stop it from being one of my favorite dishes!
Super easy. Only takes a handful of ingredients! Customize with your favorite cheeses. Perfect base for many recipes, such as the classic mac and cheese! ^^
Bonus recipe: Pickled Vegetables!
Bon Appétit!
Happy Cooking!
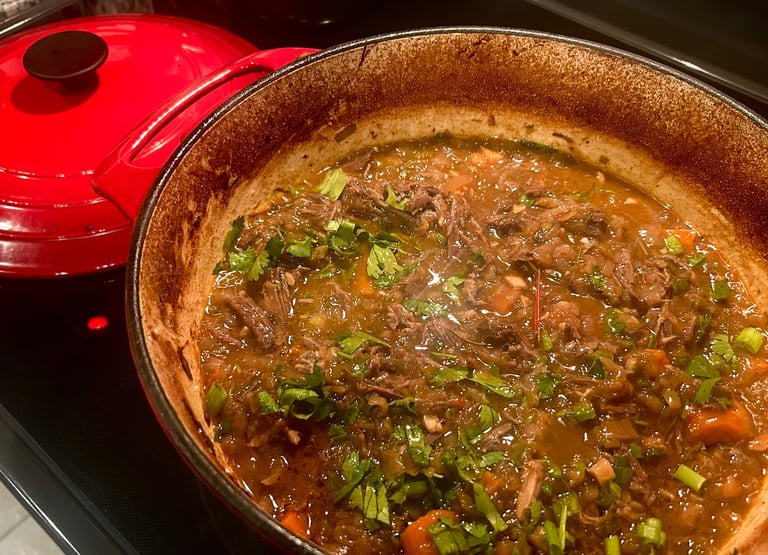
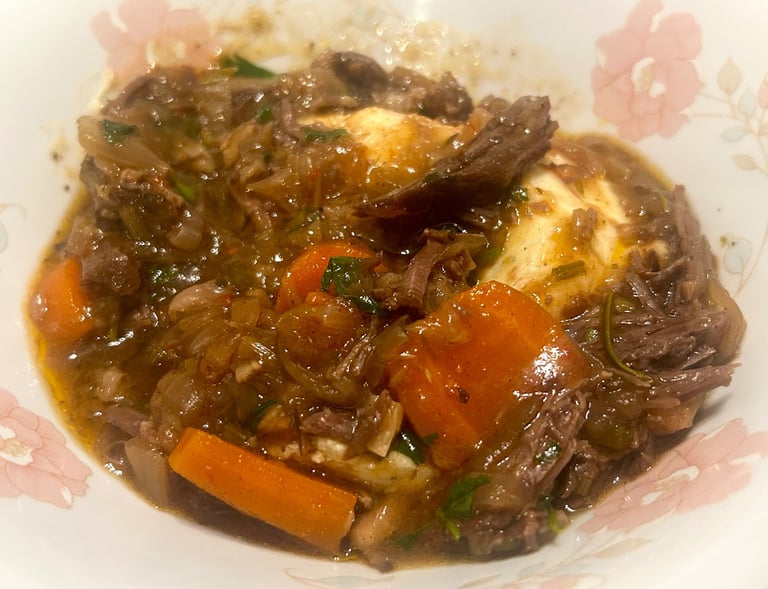
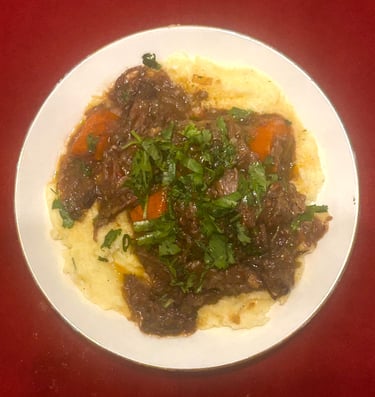
Pot Roast
If there’s an ultimate food that I could eat all the time, it would be American comfort food. From biscuits and gravy to pot roast, it’s my dream come true. Sadly, my Asian parents didn’t have either in their repertoire. Worse, I found most pot roasts at restaurants were not only overpriced but also overly salty. That is, until I found Bob Evans Pot Roast. But when I went online to search up possible copycat recipes, I was heartbroken that most promising recipes used gravy mix.
Call me picky, but I was looking for a recipe with real flavor, coming from real meat. So, my research began. In the end, I didn’t end up with a copycat but something even better. My Asian background did slip in with a lot of garlic and scallions, but I promise… this could be the best you’ll ever eat. (Trust me. We even served this to a family friend, and she said this was the best beef she had ever had. Try this and you'll see why!)
Ingredients
4-5 Pounds of Beef Chuck Roast (Sometimes, it’ll specify “Pot Roast” on the label.)
1 ½ Garlic bulbs, chopped roughly
2 Ribs of celery, chopped fine, or if you’re like me and hate celery, blended
3-4 Large onions or 6-7 small onions, chopped roughly
1-2 bunches of scallions, chopped, whites and greens separated
1 Bunch of parsley, chopped, stems and leaves separated
2 Large carrots or 4 medium carrots, chopped into 1 or 2 inches
1 tablespoon of tomato paste (OR – to make your own: 1 medium-sized tomato, a tablespoon of white wine vinegar, and a teaspoon of honey – directions below!)
1 cup of wine (Red is best, or you may use stock/water)
6 cups of liquid (Suggested liquids: Meat stock or water. I did 4 ½ cups of water and 1 ½ cups of chicken stock)
3 springs of fresh thyme
3 bay leaves
Salt and pepper to taste/season the meat
Suggested seasonings: Dried parsley, Garlic Powder, Paprika, and Mushroom Powder (commonly known as Umami Seasoning, please note that substituting mushrooms instead isn't the same), cinnamon (Another secret spice which I’ll explain later!)
Fat to sear meat (Recommended Fats – Olive oil, butter, or bacon fat. I used bacon fat!)
To thicken the sauce, use 4 tablespoons of cornstarch and 6 tablespoons of water/stock! ^^
Directions
Before you start, make sure to marinate the meat, and if you desire, make your own tomato paste! (More on that soon!)
For the best result, marinate the meat for at least an hour (Overnight is perfectly fine as well!) Salt and pepper are the most classic, but I enjoy adding dried powders such as parsley, garlic, paprika, and two secret spices: mushroom powder (or umami seasoning) and cinnamon! The mushroom powder adds an addictive saltiness that lingers, making the pot roast irresistible. Cinnamon adds just that extra taste and a bit of sweetness to balance the saltiness. But like anything, be careful not to add too much. I use a base of salt and pepper, a healthy helping of parsley/garlic powders, and a little bit of paprika. For mushroom powder/cinnamon, I use just a touch! Pro tip: Mushroom powder is very salty, so keep that in mind if you plan on using it.
If you desire to make your tomato paste (which is simple), chop the tomato into small pieces and transfer to a small pot (pulp and all!) Cover with a lid and cook until the tomatoes soften. Remove the lid and evaporate all the water. Feel free to chop the vegetables while waiting.
As the water evaporates and the tomatoes begin to thicken, begin to continuously stir to avoid burning! Continue stirring until the tomato begins to stick to the pan, becoming ketchup red, and finally a thick paste.
Once thickened, use the residual heat to cook down the tomatoes with the honey and white wine vinegar. Set aside, and move on with the rest of the recipe! ^^
In a pot, sear the meat on all sides (front, back, and sides) with your desired fat – three minutes on each. Keep in mind that this will be the pot you later cook everything in, so I recommend a Dutch Oven or using a pan with a thick bottom! If needed, add more fat (I prefer bacon fat)! The meat should sizzle, and the fat should render into the pan. Do not skip this step; it truly does wonders for the flavor!
Take the seared meat out of the pan and set it aside. Do not worry about the brunt bits getting stuck on the bottom of the pan; they will naturally come off as we cook!
Preheat oven now to 325°F
Set the flame to medium and add onions – it will seem like a lot, but they will shrink down. If necessary, add more fat to coat the onions. Cover with a lid and let them simmer for 10 minutes or until they’re translucent, stirring occasionally
Don’t stress if the onions have released a lot of their juice; that’s all flavor! Add the garlic and cook till fragrant.
Add the whites of the scallions and parsley stalks, cooking till the scallions become tender
Add the green of the scallions and cook till fragrant
Add tomato paste and stir till combined
Pour in red wine (or water/stock) to deglaze the pan, scraping up all the brown bits (If onions already did this for you, don’t worry about it, proceed to the next step)
Reduce the wine until the acidity of the wine has evaporated
Add meat back into the pot
Pour in about 6 cups of water/stock (If onions sweated a lot, start with 4 cups and add more if needed. I also use a combination of stock and water.)
Add carrots (this will raise the liquid to cover the meat), parsley leaves, thyme leaves, and bay leaves
Cover the lid and bake for 3-4 hours, depending on the size of the meat. Usually, for me, it’s around 3 ½ hours. (I promise it’s worth the wait!) You know it’s done when you poke a fork in and the meat breaks apart easily. :)
When cooked, discard the bay leaves and thyme leaves
Remove vegetables and set them aside
Transfer meat onto a plate and shred it into chunks of desired size (Sidenote: Don't be like me and make them too small... we want some bite, haha!)
Optionally, you may thicken the sauce by adding the cornstarch slurry to the cooking liquid till thickened. Add more slurry if needed.
Add the meat and vegetables back in, allowing them to soak up the delicious sauce, and if desired, serve with additional parsley!
Enjoy with, preferably, mashed potatoes made from scratch too! (Recipe released soon with other Thanksgiving favorites!)



Pâté
Pâté, or a spreadable paste made out of meat or liver, has a controversial reputation. Some say it’s delicious; others are hesitant. Even though this is often found in many French restaurants, this famous spread is an Asian delight as well! I’ve always been an adventurous eater, and organs happen to be one of my favorites. (I should credit my Asian background) There are many recipes out there, but I've found an ingenious way of cooking liver: Steaming it. (I got this idea from Weekend Meals!)
I know, I know, while the majority of the internet says to blend cooked liver into a paste…this recipe does otherwise. Instead of cooking liver in the onions and risking grainy, overcooked paste… steaming it allows the liver to maintain its softness and juiciness. Not only that, the addition of pork mince gives it body, a nostalgic nod to meatloaf.
This isn’t a pâté recipe that focuses on being a spread, but it is one of the softest pâtés I’ve ever had. But if you insist on having a spread, feel free to add the livers when your onions are soft. Once cooked, blend and serve. But do me a favor: try the steaming method at least once. You just won’t have it any other way. (And to convince you all further that liver isn't scary, I have included a pickled vegetable recipe as the perfect pairing to this spread!)
Ingredients (For Pâté)
2 large onions or 4 small onions, chopped
1 bunch of scallions, the white and green separated
½ a bunch of parsley, chopped fine, stalks only (Reserve the leaves for pickled vegetables)
2 to 3 slices of bread, soaked in milk
1 pound of liver (Approximate, I used one small tub)
¾ pound of minced pork
1 tablespoon of cooking wine
Fat (Of your choice, I recommend olive oil, butter, or bacon fat. I use bacon fat for cooking and butter for greasing my dish.)
Salt and pepper to taste
Suggested seasonings – Parsley powder, garlic powder, paprika
Ingredients (For Pickled Vegetables)
2 garlic cloves, minced
3 cups of water
2 cups of vinegar (Of your choice, I did 1 cup of rice vinegar and 1 cup of white wine vinegar)
2 tablespoons of sugar
1 teaspoon of salt
A dash of pepper (optional)
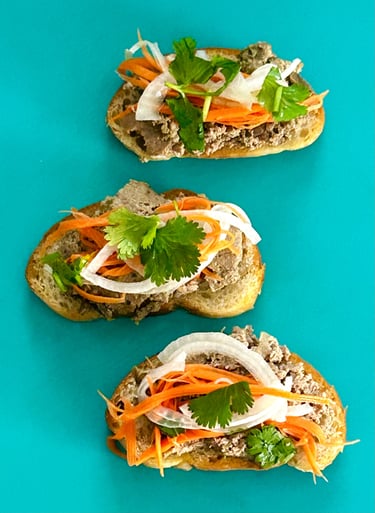
Suggested Vegetables to pickle: Thinly sliced carrots/cucumbers, onions, cilantro)
Directions
If you desire to have pickled vegetables, prepare them first, as they need to soak over time! And the longer they sit, the better they get!
In a pan, add everything except the vegetables to pickle. Feel free to adjust according to taste
Heat the brine till it is hot but not boiling
Add the brine to the vegetables and allow them to sit at room temperature to cool down before storing them in the fridge
To begin the pâté, add fat to a pan
While the fat is still cold, add garlic so the flavor permeates throughout the dish
Once the fat is hot and the garlic is fragrant, add onions, scallions whites, and parsley/cilantro stalks, and cook until soft
Add the scallions green and cook until fragrant
Set this mixture aside to cool to room temperature
In a food processor or blender, add liver, minced pork, bread soaked in milk, seasonings, and the cooked garlic/onions (The order matters! You don’t want the heat of the garlic/onions to cook the meat ahead of time!)
Blend until well incorporated
Add the cooking wine and blend one last time
Grease the dish and pour the liver mixture into the pan
Steam for 40 minutes or more, until you no longer see any pink, raw juice flowing out of the liver. (It is okay if the liver is slightly pink, but if the juice running out, not a golden yellow color, it means the pate needs a few more minutes.)
Serve on any thick, white bread, such as a baguette or sourdough
If desired, top with pickled vegetables made earlier for a winner appetizer or main meal :)


Eggplant Parmigiana
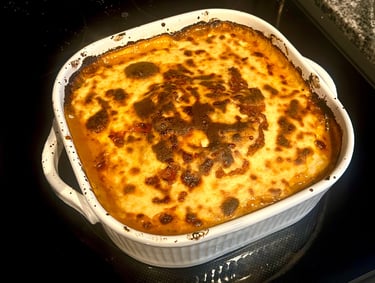
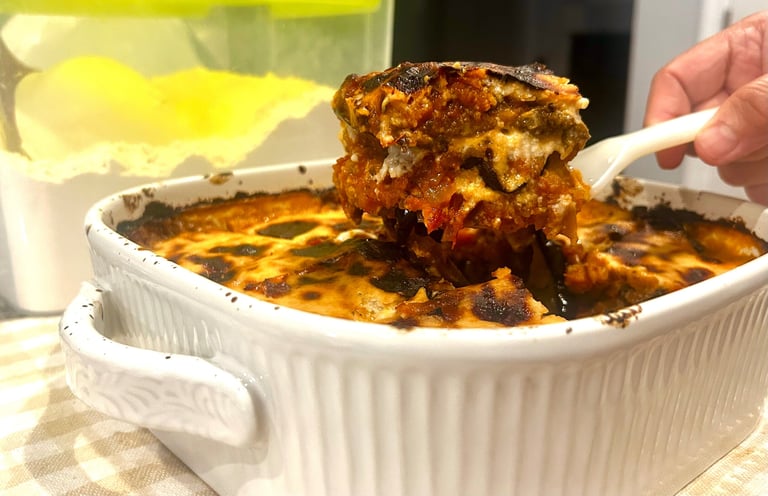
To this day, I’m unsure whether this dish is authentically Italian or Americanized Italian. I mean, let’s be real. Italians are the top critics of their food, but they have every right to be so. I have yet to go to Italy one day, but till then, this is my take on this comforting dish. My take on this classic uses a cheese sauce instead of slices of mozzarella and shredded parmesan. I know it's not traditional by any means, but after some thought, Parmigiana sounds like a plant-based lasagna. Oftentimes, lasagna is layered with tomato sauce and bechamel (and that's a cheese sauce!). I thought, why not do the same for this classic, comfort meal? The sauce allows even coating throughout the dish without worrying if the mozzarella or parmesan is melting evenly.
We finished this baby eggplant parmigiana in two days. It was that good! (I do warn you, don't skip salting the eggplant. It truly makes a difference.) Feel free if you want to make a bigger parmigiana, double the recipe! (Including the tomato sauce and cheese...sauce, haha.)
Ingredients
1 large eggplant or 2 small eggplants
Tomato Sauce (If you don't like store-bought ones, you may use my recipe! ^^)
Cheese Sauce (For this, I use mozzarella, parmesan, or a blend for the sauce. You may also use slices of mozzarella if desired.)
Salt and oil - to prep the eggplant!
Directions
Begin by preparing the eggplant
Slice the eggplant into ¼ inches slices
Line them with paper towels
Salt them on each side
Top the slices with paper towels
Set for one hour or more – as the paper towels get soaked, the excess water in the eggplant is removed. However, be mindful not to oversalt, or the eggplant will become very salty (it is a crucial step)
Brush both sides with oil and bake the eggplant slices till soft
If desired, you may also bread them with panko and fry, but this is a healthier alternative that I found from Recipe Tin Eats
In a small dish, layer the eggplant slices, then tomato sauce, and cheese (sauce)
Continue doing so until all eggplant slices are used
Top with extra sauce/cheese
If you have extra, the remaining sauce/cheese can be used in another recipe or a pasta night! ^^
Bake at 400°F for 30 to 45 minutes or until it bubbles!


Cheese Sauce
One of my favorite memories as a kid was going to Melting Pot with my mom. Now, as my mom has picked up bread-making, I was inspired to tap in making cheese sauce. Now, fondue night is one of our favorite meals! However, feel free to play around with taste or boil some macaroni, and cook a classic mac & cheese. Or use a blend of mozzarella and parmesan for eggplant parmigiana. The possibilities are up for you to explore.
Ingredients
4 tablespoons of butter
1/4 cup of flour
2 1/2 cups of milk (For extra decadent, replace with heavy cream)
8 ounces of cheese (Approximate, it never hurts to add a bit more! Cheddar is classic, but feel free to use any cheese/combination of your choice!)
A dash of nutmeg (Secret ingredient! Accentuates the flavors of cheese!)
Salt and pepper to taste (Keep in mind cheese is already very salty!)
Other recommended seasonings: garlic/onion powder, paprika
Directions
Pour milk/cream into a big pot and whisk in flour, making sure there are no lumps
Add the butter, cheese, nutmeg, and seasonings
Continue mixing on medium heat until the butter/cheese melts into the milk and flour mixture and thickens
If needed, add more milk/cream will thin it out!
Enjoy!
Ginger Carrot Soup
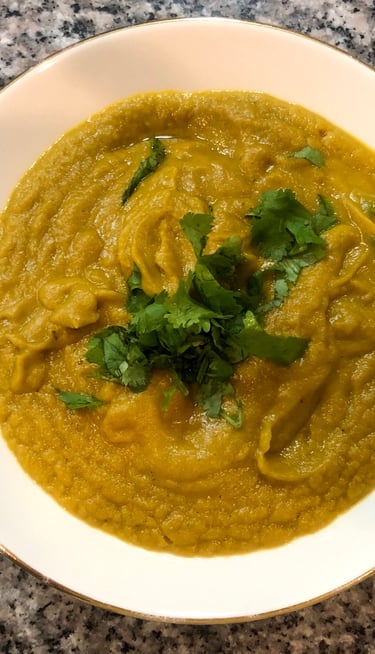
This is now present my favorite soup. The soup that Little Isabelle would have loved to have on a cold day. Little Isabelle would have loved carrots if this soup existed. :) I have been imagining this soup for a long time. Ever since I made tomato soup with the secret of adding carrots for sweetness (no sugar in this recipe!), I thought what if making a creamy carrot soup was possible. The pitiful was plainly I hated carrots when I was a kid. Scratch that. I HATE carrots now too! After all, that's why I loved the tomato soup trick. It sneaked them in for me and also took out the acidity I hated from tomato soup. But, I guess I kinda liked carrots as a kid. They were sweet when cooked right. (Raw carrots were the worst - weirdly crunchy. By the way, ranch and dips never helped!)
Just recently, I got my second teeth extraction so I finally decided to give my imagination a try! What I didn't expect was another unexpected childhood ingredient that I hated too! It was my mom's idea - ginger. I was idealizing sweet, creamy soup. But my tastebuds now more diverse, the warmth and spiciness (that I hated as a kid) seemed to be a great addition. Hence, me with gauze pads in my mouth nodded agreeably.
We made it the next day and I have to say, it was everything I imagined it to be. Sometimes, childhood hates can become a new adult favorite. Best of all, one of my favorite adults, my precious Mom adding a missing piece that truly makes this soup comforting. As I said, Little Isabelle would have loved carrots if this soup existed! ^^
Ingredients
A bunch of carrots, sliced super thin (Ensures the carrots cook down fast to get creamy!)
One bulb of garlic, minced
One bunch of scallions, cut small (Separating the white parts and green parts!)
One big onion or two small onions, sliced
Half a bunch of parsley, cut small (Separate the stalks from the leaves)
Ginger to taste, cut into fine strips (Fresh ginger can very spicy so beware! You can also omit this.)
Water or Chicken stock or mix of both
Salt and pepper to taste
Fat (I recommend olive oil and a tablespoon of butter - this is the one time where I would say to say no to bacon grease. This delicate, warm, slightly spicy soup doesn't do well with meat.)
Optional (but suggested) seasonings/add-ins: Garlic/Onion powder, dried parsley, paprika
Directions
Heat about a tablespoon of oil in a pan
While the oil is still cold, toss in your garlic to flavor the oil as it gets hot
Stir and cook until the garlic gets fragrant
Add seasonings of choice and cook for another minute
If desired, add a tablespoon of butter and stir in till it melts
Add your scallions (the white parts) and onions
Cover to allow flavors to meld together and allowing the onions to sweat (We want to draw out the sweetness before adding the carrots so they can have a flavor bath. This is also the integral flavor right here!)
When the onions turn translucent, add the parsley (stalks only) and carrots in along with more salt if needed
Cover and allow flavors to meld together and allowing the carrots to get soft (This is why you want the onions to sweat as much of their liquid as possible)
When the carrots get soft, add enough water or stock till it just covers the carrots (I like to do a mix of both - If I feel confident in my flavor, I try to only use water so I can taste the vegetables! After all, you worked so hard chopping and cooking the vegetables, why now make it taste like meat? But, I do add a little chicken stock or it's a little bland for me.)
Add your sliced ginger and scallions (the green parts) at this stage
Cover and simmer till the flavors meld together
Taste and check seasoning
Blend in batches and serve immediately with fresh parsley (leaves)!

Eggy Bread Grilled Cheese
If you’re a cheese lover and you want a twist on the familiar classic grilled cheese, take this breakfast creation. Growing up, whenever I got sick of eggs, my mom would make me eggy bread so I could still get protein. There’s something so nostalgic about golden crusty eggs wrapped around sandwich bread which is ever so soft because of the soaking. What’s more, that ideal cheese pull is so dreamy. Hence, I decided to combine the two.
This protein packed sandwich for a cheese lover is sure to please! My Cousin Jerry even exclaimed this was the sandwich better than any he had in breakfast cafés! ^^
If classic grilled cheese is your go-to, feel free to follow everything besides the eggs. :)
You can also sprinkle a thin layer of cheese in a dry pan and leave it to turn golden. Once golden, place your finished classic grilled cheese on top and wrap the cheese around the sandwich. This can give your classic grilled cheese a crispy cheese jacket!
Ingredients
Bread (The standard sandwich bread is perfectly fine as they are uniform in shape with the perfect thickness so they’re easy to portion and dunk. You may use other white breads with a soft interior but they may be harder to manage. However, avoid hard breads like French baguette or ciabatta as they resist being soaked, save those for toasting with butter.)
4 to 6 eggs depending how big your eggs are
½ to ¾ cups of cheese – optional (This is the cheese for the eggs, if you’re not a big fan of cheese or want a lighter variation, omit this extra portion of cheese. You don’t need to shred it yourself as prepackaged will work just fine. I recommended mild cheddar cheese or those four cheese blends)
Secret Ingredient 1 - ¼ a cup of milk (This is what loosens up your eggy bread making it easier to dunk and allows the egg to coat evenly! If you want something more decadent you may replace it with heavy cream! My mom once tried her version without milk, and it turned out to be anything but grilled cheese. From then on, she no longer laughs at the details of my recipes.)
Salt and pepper to taste
Optional (but suggested) seasonings/add-ins: Garlic/Onion powder, dried parsley, paprika, and nutmeg (Secret ingredient 2 as this accentuates cheesy flavors!)
Slices of cheese of your choice (My favorite has always been yellow cheddar cheese. Keep in mind to be careful not to stuff too much. I’ll share a secret trick later as well! ^^)
Other fill-ins if you so desire! (Some of my favorites are sliced avocado or bacon.)
Butter to fry sandwiches
Directions
Prepare your bread and cheese for the number of sandwiches you are going to make (This may seem minor but once your pan gets hot, things will get hectic!)
If you desire to make eggy bread, in a bowl, whisk together your eggs, milk, seasonings of choice, and cheese (if you so desire)
Heat your pan with butter (1/2 or 1 tablespoon is plenty)
Wait for your pan to heat up (This is especially important if you are doing eggy bread as you don’t want to have your bread stay in the egg mixture as it’ll get soggy and fall apart)
For easier dunking, I recommend pouring the contents into a shallow dish or rectangular cake pan so you don’t risk tearing the bread while dunking
When the pan comes to temperature (you can test it by allowing some of your egg mixture touch the butter and see it sizzle), dunk your two slices of bread into the egg on both sides and place them in the pan
Have your cheese ready
Here is where you become a grilled cheese expert! Once the bottom of the two bread slices turns golden brown, flip one of them over and place the cheese on top of the toasted bread (and other fillings if you so desire!)
The bottom of the second slice of bread should be also golden brown – do not flip over! Scoop it up (preferably with a cooking spatula) and place its toasted side on top of the bread that you just laid with cheese (The heat from both toasted sides will ensure the cheese will melt through without burning the outside.)
If needed, add more butter in your pan
Toast both sides of your sandwich until golden brown and like magic, the cheese should be melted! ^^
Continue until all your sandwiches are made. Small batches are preferable as these sandwiches are best served hot (Keep in mind to watch how hot your pan gets as you don’t want the bread to burn)
I recommend serving with a side salad and rashers of bacon
If you went with plain grilled cheese, this would be divine with tomato soup!
Hand Pies
These are hands down (Haha, get it? Hands down, hand pies?), my favorite thing ever to make. Making these delicious pies brings so much joy, and it’s so easy to make a massive batch for a casual playdate or a party. If you’re worried about all the wrappings, you may have a “hand pie night” where everyone can pitch in to help wrap these delicious pastries, which may even create fun interaction! You may also make them all ahead as the meat fillings have to cool overnight.
When served, hand pies can either be a side appetizer/snack or even a whole entrée with a side salad and dessert. To top it off, leftovers stored in a fridge can be reheated in a toaster oven or an air fryer, making an easy feast as good as fresh for a week. You may also freeze unbaked pies for later baking, or even freeze leftover filling for later wrapping and baking.
Vegetarian fillings are the quickest to make and can be ready to wrap in a pinch. If wrapping pies is too much trouble or you want to try something new, there are two options that you may consider. One is an easy dip: transfer the final mixture to a baking dish, top with cheese and bake at 350 till the cheese browns and it’s warm in the middle. The other is stuffed mushrooms: simply stuff the filling into mushroom caps, top with cheese, and bake at 350 for 12-15 minutes till golden. (You may also chop the mushroom stalks fine and add to the filling for added mushroom taste! My mom always does this as she hates waste, haha!)


Curry Puffs
Tiropita (Greek Cheese Pie)


Spanakopita (Greek Spinach Pie)
Spanakopita - Spinach Pie - Greek
It would be a miss for me if I didn’t have a spanakopita recipe. This Greek spinach pie was my favorite because of my love of spinach and cheese. I remember vividly for a preschool assignment; I wrote that I wanted CiCi’s pizza for Thanksgiving. I was obsessed with their spinach pizza. So, when my mom introduced me to Cuisine Adventure’s Spanakopita, it became my absolute favorite. After moving to college, I missed this childhood snack and decided to try to make it. I have perfected it since then and it certainly satisfies my cravings.
Ingredients
A good deal of Spinach (The more the merrier, I buy the large plastic boxes of salad green spinach from Sam’s or Costco. At least two for each batch.)
Half a bulb of garlic, minced finely
1-2 onions, minced finely
Fat for cooking (This is to cook our filling not for wrapping, you may use olive oil for completely vegetarian or use bacon fat)
8 oz of cream cheese (Good old Philadelphia cream cheese works great here. This isn’t authentic of course but I feel this adds a great deal of creaminess and makes the filling juicer.)
1-2 eggs (Lightens the mixture)
Secret ingredient: 3 tablespoons of mayonnaise (Yup. Let me explain… as a person who hates mayo – so you’re not alone, you won’t taste this. This secret ingredient somehow not only lightens the mixture but also gives a creamy, custardy mouthfeel. Trust me on this.)
1 to 1 ½ cups of shredded cheese (No need to fuss on shredding it yourself, I recommend mild cheddar or those four cheese blends packages!)
¼ cup of feta cheese (You may need to adjust this depending on how salty your feta is!)
Optional (but suggested) seasonings/add-ins: Garlic/Onion powder, dried parsley, paprika, nutmeg (another secret ingredient – accents cheese flavors)
Salt and pepper to taste
Phyllo dough
Some butter/olive oil for wrapping (We will heat this up just before wrapping. Choose either one depending on your dietary needs/occasion. Butter tastes the best but olive oil is healthier. When I make this, I do half of each ^^)
STUFFED MUSHROOMS Recipe: If you’re planning to stuff mushrooms with this recipe, if desired, cut up those mushroom stalks fine for the filling
Directions
Set a pot of boiling water to blanch the spinach till its cooked
Remove as much water from the spinach as you can using a cheesecloth or pressing against a strainer
Chop fine and set aside for now
In a pan, heat fat and cook minced garlic until fragrant
Add minced onions and cook until onions are translucent (You can add some salt to prevent them from browning)
Add finely chopped spinach and allow the flavors to meld together (This is also the stage where you can add finely chopped mushrooms)
Take off the heat and set aside to cool
In a separate bowl, mix together the cream cheese, shredded cheese, feta till mixed (Don’t worry if it’s hard to mix as the eggs will make everything smooth)
Add mayonnaise and seasonings of choice
Once you reach your ideal taste, add your eggs – this should make the mixture generally smooth now!
By now, your spinach should be warm but not hot, let it cool longer if you need to
Once cool, add your spinach into your cheese mixture and mix till combined
To wrap, begin by melting your butter or measuring a ½ cup of olive oil or if you’re like me, half of both (I do this by melting two tablespoons of butter first and then cooling it down with a little more than ¼ cup of olive oil)
Prepare your baking sheets to be loaded with joy
Preheat your oven according to package directions, you want to do it now because trust me, it’ll go by fast!
Depending how big your sheets are, you may want to cut them in half
Take a sheet of phyllo pastry and brush on butter/olive oil
Place another sheet on top (DO NOT press down as you will lose the layers and hence flakiness)
Brush on more butter/olive oil (You don’t need much each time, so lightly tap the brush against the cup to remove any excessive amounts of fat. You don’t need to have pools of fat for flakiness.)
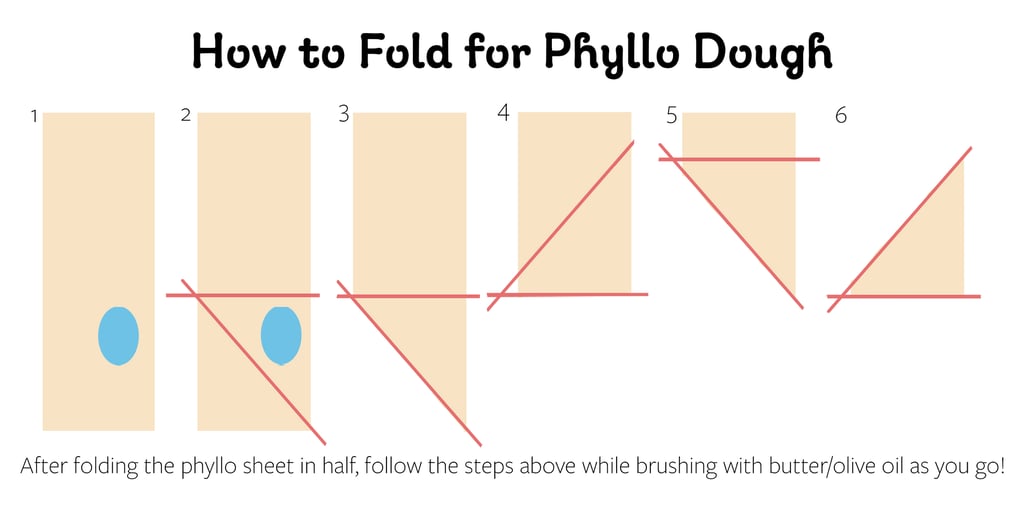
Fold your sheets to form a long rectangle (Please refer to my diagram illustration for the wrapping steps)
Brush on more butter/olive oil
At approximately 1/3 of the bottom of the phyllo dough, place one teaspoon of filling
From that same spot, pick up the corner of the phyllo dough and gently seal the filling almost like dog-earing a page of a book
Brush on the triangle more butter/olive oil
Fold over while keeping the triangle’s original form
Brush on more butter/olive oil
Fold over once again, keeping in mind not to press!
Brush on more butter/olive oil
Continue the steps depending how long your rectangle is finishing with a tuck in if needed!
Brush one last time on top and continue wrapping till you run out of filling, pastry, or patience (Haha)
Bake according to your package’s directions, for me it takes about 15 to 20 minutes
Feel free to continue wrapping more while one batch bakes if you so desire! Or if not, relax and enjoy while warm! (Don’t forget to let them cool because these are really hot coming out of the oven)


Tiropita – Cheese Pie - Greek
I love Tiropita as much as I love Spanakopita. I wish this was as popular as its cousin, spanakopita. After all, who doesn’t like cheese? This definitely pleases cheese lovers and if spinach isn’t your thing, this is an excellent second option. Simply follow everything above except cooking the spinach! ^^


Meat Lover's Puff - American
This recipe began after an unsuccessful shopping trip. My mom had bought some butcher fresh bacon and ham. What we didn’t expect was the thick streaks of fat and thin streaks of meat (Not recommended). In the end, we rendered the fat down to make crispy pork rinds (one of my grandfather’s favorite snacks) and chopped the bacon and ham for my attempt to recreate Starbuck’s egg cups. The result was awful so I decided to use the remaining ingredients to make a “meat lover’s hand pie.” It was a gamble, but the pies were delicious. If I were to make this again though, I would stick to the usual packaged bacon and ham.
Ingredients
1 bulb of fresh garlic, minced finely
3 large onions, diced
½ to a 1 pound of ground beef
½ cup of diced cooked ham (No sweet ham here please)
½ cup of diced cooked bacon (Reserve the fat if you want to use it)
5 tablespoons of soy sauce
Salt and pepper to taste
Optional (but suggested) seasonings/add-ins: Garlic/Onion powder, dried parsley, paprika, dried basil, dried oregano
Puff pastry (I recommend Greenwise)
Egg wash (One egg and enough water to thin, beaten together)
Directions
In a pan, heat fat and cook minced garlic until fragrant
Add minced onions and cook until onions are translucent and almost jammy (You can add some salt to prevent them from browning)
Add your bacon and ham and seasonings of choice, allowing flavors to meld together
Finally, add your ground beef and cook till the meat is no longer pink
Adjust seasoning and allow filling to cool on the stovetop before transferring to a container to cool completely in the fridge! Overnight is best.
To wrap, make your egg wash with an egg and thinning out with water
Then, prepare your baking sheets to be loaded with joy
Preheat your oven according to package directions, you want to do it now because trust me, it’ll go by fast!
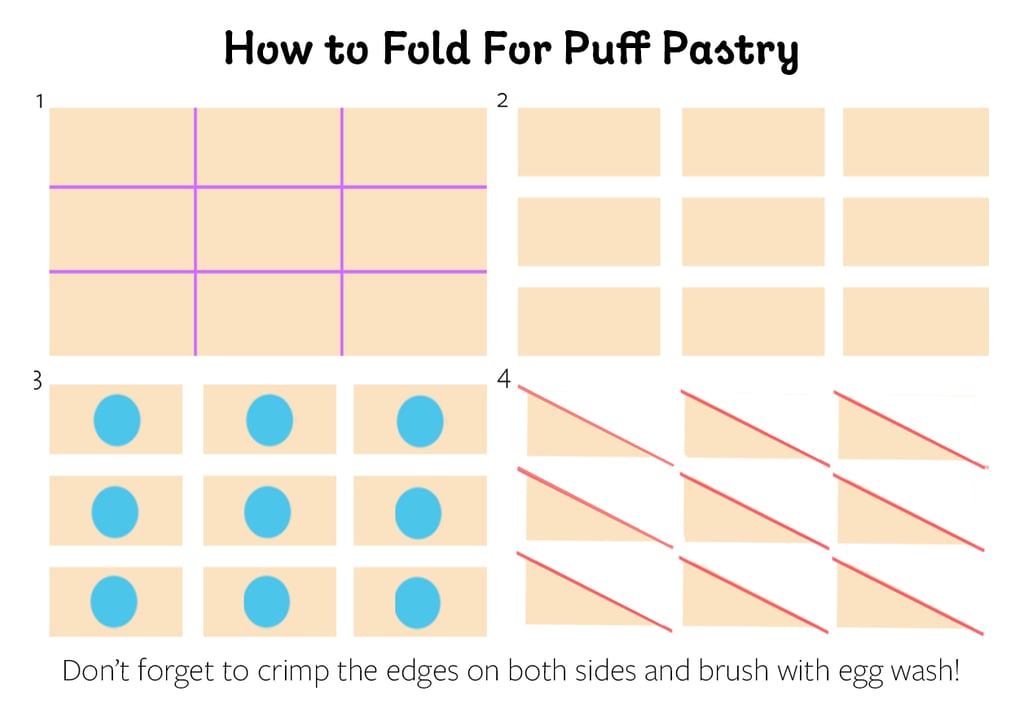
Cut your puff pastry into small squares (Please see the diagram illustration for the wrapping steps!)
Scoop about a teaspoon of filling on top of each square
About this time, the puff pastry will start to get soft so quickly fold each one into the shape of a triangle, don’t worry about crimping them yet
Once each triangle is formed, take a fork and crimp the edges (Don’t forget the back!)
Place on the baking sheet and brush each one with egg wash
Bake according to your package’s directions
For me, it takes about 20 minutes
Pork Pie
We have Meat Lover’s, and now we have Pork pie. I’m so excited to share this new hand pie recipe. I still have leftover filling in the freezer (all these fillings can stay fresh for several weeks if frozen). This is inspired by my Meat Lover's, except this one focuses on a celebration of pork. The sweet onions and bacon are my favorite additions, giving a vibe of bacon and onion jam to this filling. Definitely one of my favorite pork pies so far.
Ingredients
1 pound of pork mince (Seasoned with olive oil to moisten, ¼ cup of soy sauce, 2 tablespoons of cooking wine, chopped parsley, and salt and pepper to taste. Ideally, you want this to marinate overnight.)
1 pack of bacon, fried till crisp and crumbled (Reserve fat for cooking)
5 garlic cloves, minced
2 large or 4 small onions, diced
3 ribs of celery, cut very small or blended
3 bunches of scallions, chopped fine, white and green separated
Half a bunch of cilantro, chopped, stalks and leaves separated
1 large carrot or 3 small carrots, shredded
Salt and pepper to taste
Suggested seasonings: Parsley powder, garlic powder, paprika
Puff pastry (I recommend Greenwise)
Egg wash (One egg and enough water to thin, beaten together)
Directions
In a pan, heat the bacon fat reserved from crisping up bacon
Add onions, and add more fat to coat onions if needed
Cover with a lid and let the onions soften
Add garlic and cook till fragrant
Add seasonings of your choice
Add celery and the whites of the scallions and the stalks of the cilantro, and cook until the scallions soften
Add carrots and cover and cook till soften
In a separate pan, add more bacon fat and cook the marinated pork mince, breaking it apart as you cook
Once cooked, add crumbled bacon and allow the two meat flavors to meld
Around this time, the carrots should be softened
Adjust the seasoning of the vegetables
Add the cooked pork mince and bacon
Allow flavors to meld and cool the filling overnight
The wrapping and baking directions are the same as Meat Lover’s Puff!
Curry Puffs - Asian
This is one of the most beloved Asian snacks out there! ^^ It is commonly displayed at Chinese bakeries along with other traditional baked goods. My mom and I made this once when I was in middle school but cooking wasn’t in my repertoire then. This recipe is certainly much better than when we first started out. :) These aren’t spicy especially if you mild down the filling with some milk. However, feel free to make it spicier if you so desire!
Ingredients
1 bulb of fresh garlic, minced finely
3 large onions, minced finely
1 bell pepper, blended - optional
Note about the vegetables - I strongly recommend the first two, they will seem like a lot but onion likes to sweat down so it’ll turn into a small pile in no time at all. Garlic and curry are also best friends. If texture is a concern, feel free to blend the onions/garlic, you’ll still get the taste that way. :)
The peppers are optional, but they not only sneak in vegetables but also bring some sweetness. The sweetness balances well with the spicing of the curry. I wouldn’t mince this or chop finely as the crunch of the peppers will turn mushy and unpleasant. We’re mainly using this for taste.
½ to a 1 pound of ground beef (You can use other meats too but I believe beef is the most traditional!)
¼ - ½ a cup of soy sauce (You may need more so taste as you go)
Salt and pepper to taste
Fat (Olive oil is healthiest but I recommend bacon fat if you’re going for delicious!)
Curry powder (I recommend Golden Curry Japanese Curry Mix, double check that the flavor profile is “Mild” if you’re not into spicy)
Milk (To mild down curry if needed)
Optional (but suggested) seasonings/add-ins: Garlic/Onion powder, dried parsley, ginger powder, paprika, turmeric, coriander, cumin
Secret Ingredient: Mushroom powder/Umami seasoning (This is hard to find so, in the worst case, find a seasoning that has mainly mushroom powder and you are golden! This adds a special salty hit that makes these to die for but don’t sweat it if you don’t have it. DO NOT replace it with mushrooms, it’s not the same.)
Puff pastry (I recommend Greenwise)
Egg wash (One egg and enough water to thin, beaten together)
Directions
In a pan, heat fat and cook minced garlic until fragrant
Add diced onions and cook until onions are translucent and almost jammy (you can add some salt to prevent them from browning)
Remove from the pan and save for later
Heat more fat in your pan, add your ground beef and cook till the meat is no longer pink
Add soy sauce and seasonings of choice – but keeping the curry for later
In a separate pan while this is cooking, pour the blended peppers in the pan and cook till the water from it is evaporated
Add some curry powder and cook for a little longer
Taste the ground beef to make sure the seasoning is on point (especially with the soy sauce since adding soy sauce after this point will make the vegetables overly salty and bitter)
Add the stir-fried peppers, and the prepared onions/garlic and allow flavors to meld together
Taste while adding curry powder, adding a little at a time to make sure the curry is prominent but not overpowering
Add milk to mild down the curry if it’s too spicy
Adjust other seasonings EXCEPT for the soy sauce
Allow the flavors to meld together one last time while letting the filling cool on the stovetop. Then, transfer to a container to cool completely in the fridge! Overnight is best.
The wrapping and baking directions are the same as Meat Lover’s Puff


Sushi
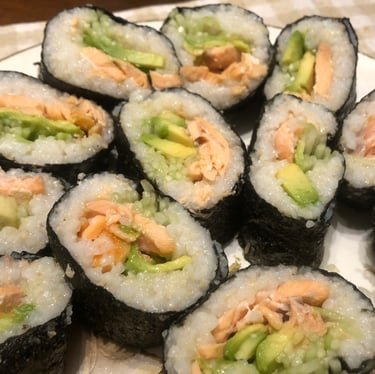
Sushi or any seafood is my favorite food of all time. It's my comfort food and celebration food. However, they can be quite pricey so my mom and I decided to make them from home. The sushi rice is surprisingly easy to make and the possibilities are endless! Just make sure you chop your filling small so your rolls won't burst. ^^
Ingredients
Cooked rice (Sushi rice or any sticky variation of rice should be fine! Just don't do glutinous rice cause it'll be too sticky nor basmati as it'll be too dry.) from about 1 1/2 to 2 cups of raw rice
Rice vinegar (About a 1/4 to a 1/2 cup, be mindful here as it depends how seasoned you want your rice to be. Also, please do not use any other vinegar as they are much too acidic for sushi rice.)
Sugar (Preferably white sugar and I use about a tablespoon or two but this is to your taste.)
Salt (Regular salt works just fine and I use about a teaspoon and a pinch more but this is to your taste.)
Seaweed sheets (Do not use mini seaweed snacks, they don't provide enough space for wrapping.)
Any fillings you want to add :) I like salmon cooked medium rare, grated cucumber, and avocado but you decide your desired fillings.
Directions
Prepare fillings
When you are ready to make the sushi rice, wash the rice till the water runs clear
Add enough clean water back to the rice just to cover it slightly
Cook your rice and when it's almost cooked, go ahead and begin your rice vinegar mixture
In a small pot, add your rice vinegar, sugar, and salt
Turn on the heat to low and heat mixture till sugar and salt have melted
Set aside and pour cooked rice into a cooled tray
Spread out flat to allow as much surface area for the vinegar mixture as possible
Pour vinegar mixture and stir it into the rice, a little bit at a time
Taste as you go so you make sure it's seasoned to your liking
Allow rice to cool to room temperature to prepare for rolling
When you're ready, layer sushi rice on top of a seaweed sheet, being mindful to leave an inch or two of space. This will be paramount when you roll it up. You don't want to ooze rice everywhere.
Lay (Don't pile) your fillings starting from the middle and lay each filling next (Not on top) to each other. Be careful not to overstuff, this takes trial and error.
Gently roll, starting from the part with the rice to the edge
When you reach the end, take a bit of the sushi rice and use it as a glue to seal your roll
If it cracks, wrap another seaweed sheet around the roll
Slice using a fast, sharp knife and serve with soy sauce and wasabi! ^^

Tomato Yum Yum
When I first started this website, I published this recipe. It was the first savory recipe I posted. Just like website building, I had a lot to learn in cooking. After some time, I realized my previous tomato sauce/soup could be made better. For nostalgic purposes, I copied the original recipe here. (This reminds me that improvement takes time.)
As I mentioned in the past, this recipe is multipurpose. Hence, I gave it a silly name, “Tomato Yum Yum.” It’s a soup which can be customized to your ideal texture. Or, you can use it as a sauce with or without meat! ^^
This is my dream tomato sauce, sweetened with onions and carrots instead of sugar. As a playful disclaimer, I do not expect to impress any Italians, but I hope you may enjoy this as well. It’s my absolute favorite, and I enjoy making this when I have time. Because truly, a good tomato sauce is an act of love. I enjoy this very much with pasta or in my eggplant parmigiana.
Ingredients
1 whole Garlic bulb, minced
2 stalks of Celery, minced/blended (I despise celery, so this is how I force myself to eat it.)
2-3 carrots, diced/cut small (The secret ingredient! By adding carrots, we add sweetness without needing sugar. The Italians do this! If you hate carrots, feel free to cut them in bigger pieces to be removed before eating/blending. You’ll still get the sweetness that way, but I don’t even notice them when diced and blended.)
A bunch of scallions, chopped fine, with the white and green separated
A bunch of parsley (also known as cilantro), chopped fine, with the leaves and stems separated
3 large onions or 4-6 small onions, diced (This is the second secret to sweet sauce. If you’re sensitive to textures or picky, feel free to blend it just like the celery.)
2-4 tomatoes, chopped
Note the tomato to onion ratio - I adore the sweetness that onions bring to tomato sauce. Because of that, I had more onions than tomatoes in my sauce. If you prefer acidity, add an extra tomato or two! There are no exact measurements so play around to see what you like!
Salt and pepper to taste
Suggested seasonings: garlic/onion powder, dried parsley, paprika, dried oregano, dried basil, thyme, bay leaves (3)
2 tablespoons of fat and more if needed (it's your choice! I like using butter and olive oil - I will explain later in the recipe)
Water/stock (If needed)
Heavy cream/milk (optional)
Directions
Prep and chop the vegetables
In a large pan, add a drizzle of olive oil - just enough to coat the chopped garlic (do not use butter as it will mask the flavor of the garlic in this early stage)! As the pan heats up, season with some pepper and seasoning (excluding the bay leaf and thyme), and sauté them until the garlic gets fragrant
As soon as the garlic gets fragrant, add a tablespoon of butter to deglaze the pan, and add the onions and cook till translucent
Add celery, parsley stalks, the white of the scallions, and onions, and cook until soft
Add the parsley leaves and the green of the spring onion, cook until soft
Add the carrots and cover till soft, also allowing the flavors to meld
Meantime, in a separate, medium pan, add a little olive oil (add butter if desired), add the tomatoes (smashing out their juice), and add seasonings to your taste, adding in the bay leaf and thyme
Check back at the softness of the carrots
Adjust seasoning
Once the tomatoes have softened, turned to a rich red color, so that their juice has been released, transfer them to the other vegetables (along with the thyme and bay leaves)
Simmer for 20 minutes or until flavors are melded
Add stock or water to thin out your base if the tomatoes aren't juicy enough.
Discard bay leaves and thyme, and proceed based on preference!
For SOUP
For chunky soup - leave as if and serve piping hot
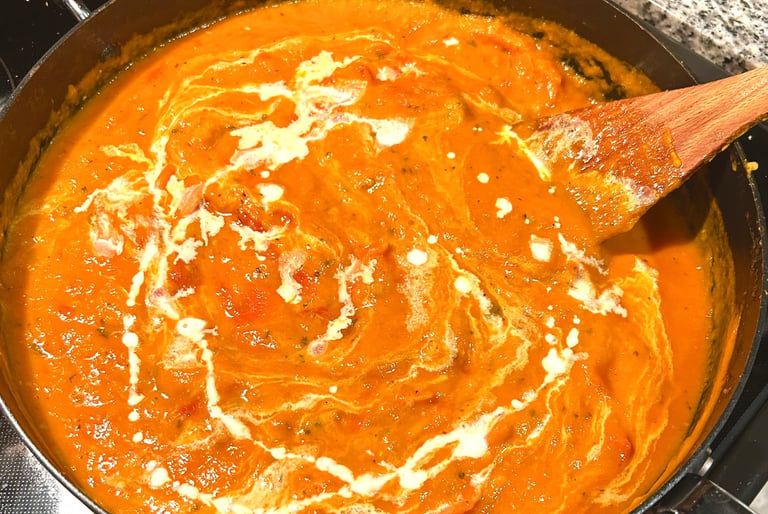
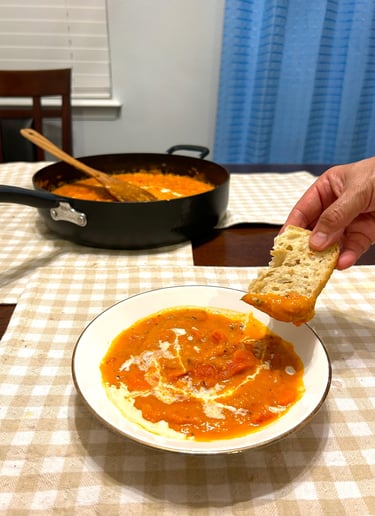
For creamy soup or smooth tomato sauce - add heavy cream/milk and blend in batches until smooth and serve hot. If desired, drizzle cream/milk over for garnish.
For SAUCE
For tomato sauce or an in-between soup - blend half of the soup! When smooth, add back into the pot and simmer for another 10 minutes or until flavors are melded
For meat sauce – blend all the tomatoes till creamy smooth, adding cream/milk if desired. In a separate pan, brown meat (pork, beef, sausage, or any blend of your choice) and remove any excess fat. Put the blended tomatoes in a pan and add the browned meat. Heat till warm and serve!
I have other hobbies too!
My main passion is art!
